
📈[COMPARACIÓN] PC para FOTO y VÍDEO: 4500€ vs 1500€ del 2011…FIGHT!!!!🥊
Bueno, pues 10 días después de desembalar el nuevo ordenador, esa bestia que os enseñé en este vídeo, y que aún no he podido ni probar, voy a cumplir (otra vez) vuestros deseos y a hacer este vídeo que me habéis pedido como 30 veces en la última semana.
Desde que os enseñé las monstruosas especificaciones del nuevo ordenador con el que voy a trabajar en los próximos años, todos habéis tenido la curiosidad de ver “cómo se compara” con el resto de ordenadores con los que trabajo. Así que, en este vídeo lo que quiero es poder analizar, con ejemplos reales las diferencias que vamos a encontrar en el día a día cuando me enfrente a mi trabajo cotidiano.
DISCLAIMER: lo primero de todo, en mayúsculas, negrita y subrayado: ESTA PRUEBA ES UN AUTÉNTICO DESPROPÓSITO. NO TIENE SENTIDO ALGUNO COMPARAR UN ORDENADOR GAMA MEDIA DE HACE 10 AÑOS CON UN PORTÁTIL DEL 2018 Y A SU VEZ CON UN TOPE DE GAMA DEL 2020!! Es como comparar mi Kia Sportage del 2011 con una rosquilla de anís y con un Tesla Roadster del 2020.
Dicho esto, creo que es un ejercicio gracioso, el poder ver con cifras el tiempo que voy a ahorrar haciendo las cosas que habitualmente realizo, que son exactamente las que voy a comparar en las pruebas finales de este vídeo. Vamos a ello:
LOS EQUIPOS
Lo primero es analizar los contrincantes:
PC Antiguo (Desktop2011)
- Intel Core i7 3770 4 nucleos; 3.4GHz
- 24GB RAM DDR3
- GPU Nvidia Quadro P4000
- SSD Samsung 860 Evo
Portátil LG Gram (Laptop2018)
- Intel Core i7 8550U 4 nucleos; 1.8GHz
- 24GB RAM DDR4 2400MHz
- GPU Intel UHD Graphics 620 (integrada)
- SSD Samsung 860 Evo
PC Actual (Desktop2020)
- AMD Threadripper 3960X 24 Núcleos; 3.8 GHz
- 64GB RAM DDR4
- GPU Nvidia GeForce RTX 2080 super
- SSD NVMe 960
EL OBJETIVO ¿Qué voy a evaluar?
Muy sencillo, simplemente quiero evaluar el rendimiento de todos mis equipos en las 3 tareas que más utilizo Revelado RAW, Procesado fotográfico en Photoshop y edición de vídeo en DaVinci Resolve.
Cómo analizar TODO lo que se puede hacer con estos programas (especialmente con Photoshop y Resolve) es una quimera (no tiene nada que ver alguien que haga animación 3D con un fotógrafo por ejemplo) voy a centrarme en las tareas y parámetros que más me interesan en los 3 bloques que más utilizo:
- En cuanto al revelador RAW (Lightroom y Capture One):
- Tiempo en la importación de los RAW
- Tiempo en generar las Vistas previas
- Tiempo en crear una máscara de luminosidad y en refrescar
- Tiempo en copiar y pegar ajustes a múltiples RAW (con y sin máscaras de luminosidad)
- Tiempo en Exportar RAW
2. En cuanto al procesador de imágenes (Photoshop):
- Tiempo en abrir un archivo tiff
- Tiempo en abrir un psb con capas
- Tiempo en realizar una Panorámica 6 archivos RAW
- Tiempo en realizar un Focus Stacking
- Tiempo en añadir Color efex
- Tiempo en Guardar un archivo psb con capas
3. En cuanto al editor de vídeo (Davinci Resolve):
- Evaluar el visionado de los archivos con y sin generación de archivos optimizados o proxies
- Tiempo en el renderizado con diferentes grados de efectos y correcciones de color
LA METODOLOGÍA ¿Cómo lo voy a evaluar?:
Para ayudarme a cumplir mis objetivos, simplemente voy a poner a prueba los 3 equipos realizando una serie de tareas cotidianas agrupadas en los 3 bloques que os he comentado (RAW, Fotografía y Vídeo). Para ello voy a usar tanto mis archivos propios como varios de los tests o benchmarks, más usados en la industria. Están específicamente diseñados para trabajar con las aplicaciones más comunes en fotografía y video y ponen al límite nuestros equipos, así que a parte de analizar esas variables que os he comentado analizan prácticamente todo!!: Lightroom Bench; Photoshop Bench; Da Vinci Bench y Cinebench R20. Echad un ojo pa los links si queréis tener más detalles de todo lo que analizan!!!
[box type=»info»] P.D. Os ruego encarecidamente que echéis un ojo a los links de los tests donde nos explican qué hacen y cómo lo hacen[/box]
1. Evaluar los Reveladores RAW
Vamos a usar Lightroom y Capture One, que son los más comunes y me consta que el 99% de vosotros usáis uno u otro. Básicamente voy a medir el tiempo que se tarda en importar, generar vistas previas y exportar diferentes formatos (NEF, CR2 y ARW) con diferentes resoluciones, desde 24Mp a 61 Mp. Aparte, con Capture One que es mi revelador favorito voy a hacer algunas pruebas adicionales como la sincronización de ajustes simples y complejos de uno a múltiples RAW.
Para evaluar el rendimiento en Lightroom vamos a usar el test de Puget System. En el enlace podéis ver exactamente qué es lo que hace este test, pero básicamente coge 500 imágenes de una Canon 5D MIII, Sony a7RIII y Nikon D850 y les hace las tareas habituales: Importar al catálogo, crear vistas previas, crear vistas inteligentes, hacer zoom al 100%, Pintar con el pincel de ajuste, hacer panorámicas, hacer HDR, exportar a JPEG…Vamos un test muy completito.
En Capture One simplemente voy a usar mis archivos y voy a hacer lo siguiente:
- Importación de 500 RAW de la Sony a7RIV
- Generación de las previsualizaciones
- Tiempo en crear y refrescar una máscara de luminosidad con radio y sensibilidad al 100%.
- Tiempo en copiar y pegar ajustes a múltiples RAW (500 RAW con una capa extra y un estilo aplicado en la capa)
- Tiempo en copiar y pegar ajustes a múltiples RAW (20 RAW con tres capas y máscaras de luminosidad. 1 Estilo aplicado en cada capa.)
- Tiempo en Exportar los RAW (50x a JPG a 60% calidad y 3840 px lado largo y ajustes básicos de revelado(
2. Evaluar el rendimiento en Photoshop
Aquí, voy a realizar dos cosas: en primer lugar vamos a ejecutar el test de Puget Systems para ver qué nos dice de manera global. Y luego, directamente, voy a realizar las tareas que suelo hacer con más frecuencia utilizando varios de de mis archivos. Entre ellos un .psb monstruoso de más de 7 GB y decenas de capas. Voy a analizar lo siguiente
- Abrir un archivo tiff 16 bits procedente de un RAW de 61 MP (344 MB)
- Abrir un psb de 8GB con decenas de capas
- Realizar una Panorámica 6 RAW de 42MP
- Realizar un Focus Stacking con 3 tiffs de 16 bits y 24MP
- Añadir 3 filtros de Color Efex al PSD de 8GB
- Guardar el archivo psb de 8GB
3. Evaluar el rendimiento en edición de vídeo: DaVinci Resolve
Teniendo en cuenta lo completo que es DaVinci Resolve, aquí habría mil cosas que analizar. Por lo tanto, para no perder la cabeza y mucho tiempo vamos a ejecutar el test benchmark de Puget Systems que evalúa 5 tipos de archivos (codecs) utilizando clips cortos de entre 15 y 30 segundos:
- 4K CinemaRAW Light
- 4K H264 150Mbps 8bit
- 4K ProRes 422
- 4K ProRes 4444
- 4K RED
A cada uno de esos archivos se les realiza 5 tipos de procesados diferentes. Desde el renderizado limpio sin corrección de color, hasta una corrección de color muy avanzada, con nodos de efectos OpenFX y reducción de ruido que son muy, muy exigentes:
- Optimized Media: Archivo sin ningún tipo de corrección. Ideal para saber cómo se comportará el equipo para hacer archivos optimizados (proxies).
- Basic Grade: Corrección de color básica
- OpenFX: Se añaden 3 efectos Open FX: Lens Flare + Tilt-Shift Blur + Sharpen
- RR simple: Reducción de Ruido
- RR Compleja: 3Nodos de Reducción de Ruido
Yo por mi parte creo que hay dos tipos de archivos que son representativos de lo que utilizo en mi día a día: el h264 de 8 bits (equivalente a los archivos que grabo con mis Sony) y el ProRes 422. Y entre los ajustes posteriores, voy a quedarme con Basic Grade, que es fundamentalmente lo que yo hago en mis vídeos día a día. Por lo tanto esta combinación de Codecs y procesados a los que más atención voy a prestar y a los que analizaré en los resultados (clips de 25 y 12” respectivamente)
Además, a modo casi anecdótico, vamos a usar el Benchmark Cinebench R20, uno de los más utilizados en la industria audiovisual para ver donde anda el equipo más potente en comparación con el resto del mundo jejeje..
Los resultados.
Vamos a analizar los resultados agrupados en los 3 grandes bloques
1. Reveladores RAW: LIGHTROOM y Capture ONE
Si nos quedamos con los resultados del Test de Puget obtenemos lo siguiente:
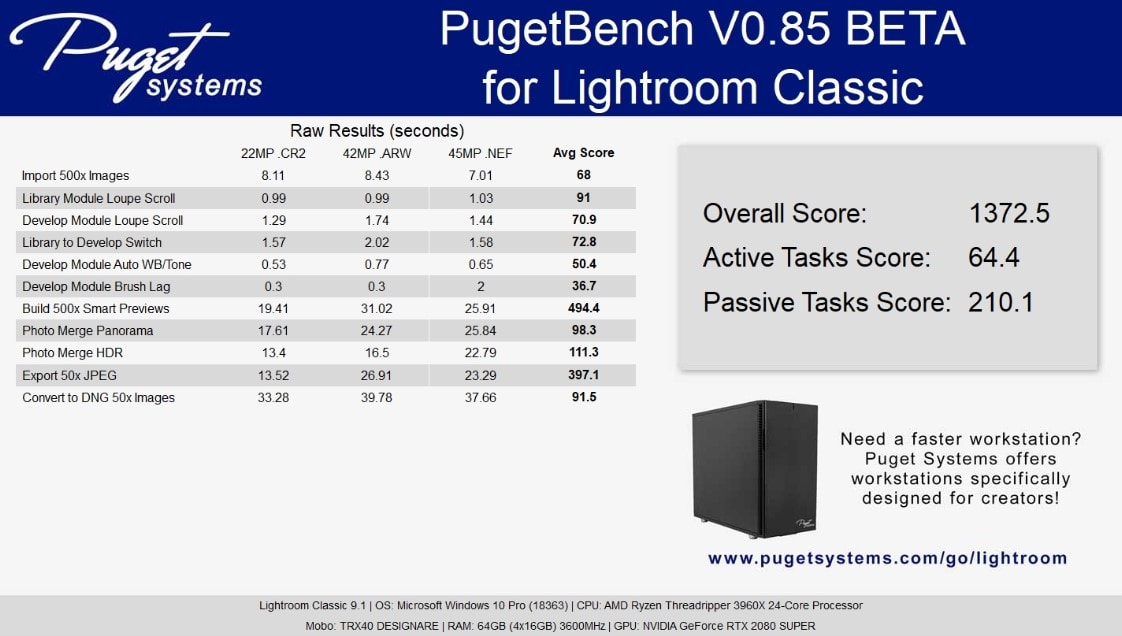
Como se indica en el link del test, los resultados están referidos a este PC de referencia:
- Intel Core i9 9900K 8 Core
- NVIDIA GeForce RTX 2080 8GB
- 64GB of RAM
- Samsung 960 Pro 1TB
- Windows 10 (1903)
- Adobe Lighroom Classic CC 2019 (ver. 8.4)
Que obtiene los siguientes resultados:
- Overall Score: 1000
- Active Tasks Score: 100
- Passive Tasks Score: 100
Como véis, el rendimiento global es un 37% mejor que el ordenador de referencia, pero la clave son las tareas pasivas (vistas previas y exportación de RAW basicamente), donde rinde más del doble que el PC de referencia. En las tareas activas sorprendentemente los resultados son peores. En cualquier caso, las cosas en las que realmente se va el tiempo son las tareas pasivas, y sobre todo cada uno tiene que analizar las cosas que más utiliza en su dia a dia. Yo tengo claro que quiero mejorar tiempos en exportación y en geenración de vistas previas.
Basicamente hay 5 cosas que me interesa evaluar ya que son las que realizo constantemente en mi trabajo:
Tiempo en la importación de los RAW
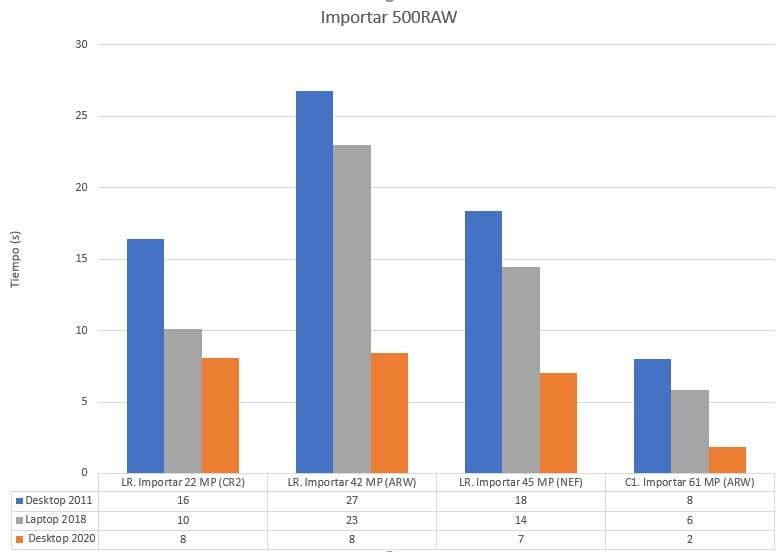
La importación de los RAW no es una tarea especialmente exigente, por lo que salvo ordenadores muy antiguos y con CPU malas no deberíamos encontrar grandes diferencias que nos hagan perder la cabeza.
En nuestra comparativa, podemos apreciar la gran diferencia de rendimiento entre Lightroom y Capture One, y entre los ordenadores podemos ver como el más lento es el Desktop 2011 que tarda entre 16” y 27” en importar 500 RAW por los apenas 8” del nuevo Desktop 2020. Estos números valen para Lightroom, en Capture One, al ser más rápido, las diferencias son menores (8” el más lento y 2” el nuevo Desktop 2020)
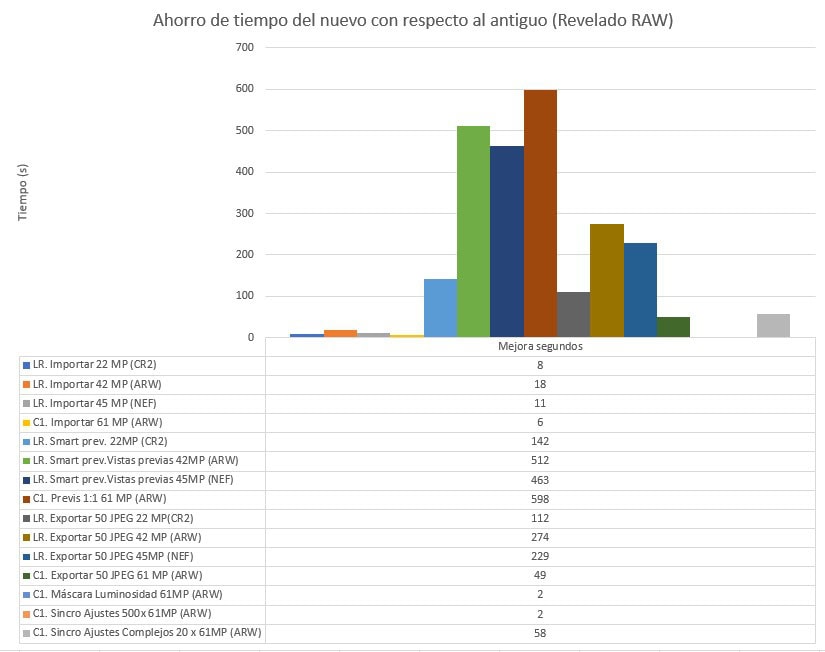
2. Tiempo en generar las Vistas previas

Aquí he realizado la prueba tanto con las smart previews de Lightroom, como con las previsualizaciones de Capture One. Hay que destacar, que las previsualizaciones de Capture One estaban siendo realizadas a 3840 px mientras que las Smart Previews de Lightroom tienen prácticamente la mitad de esa resolución. De ahí la gran diferencia entre las previsualizaciones y las smart preview en los gráficos. *Si realizamos las smart preview a full size el tiempo de generación se multiplica por 3.
Sin duda este es uno de los apartados que más interés tenía por analizar ya que es uno de los cuellos de botella más importantes en mi flujo de trabajo. Los resultados del gráfico hablan por sí solos, y podemos ver como el nuevo desktop realiza los smart previews de Lightroom en el 5% del tiempo que tarda en desktop 2011 (489” por 26 del nuevo). Esto es una auténtica locura!!!
Si nos vamos a Capture One con sus previsualizaciones a mayor tamaño, podemos ver como el nuevo ordenador realiza las 500 previsualizaciones en un 30% del tiempo (293”) que tarda en hacerlo el antiguo (891”)
El ahorro de tiempo en este apartado, como ya esperaba, es de los mayores avances que vas a conseguir con un buen procesador multinúcleo.
3. Tiempo en crear una máscara de luminosidad y en refrescarla
Aquí es difícil medir el tiempo ya que es un proceso relativamente rápido.
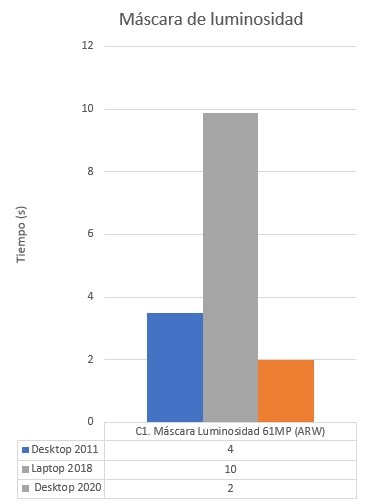
En todos los casos la creación de la máscara de luminosidad es casi inmediata. Cierto es que en el Desktop 2020 el tiempo es menos de la mitad 2 segundos frente a los 4 del Desktop 2011. Y el ahorro es del 80% si lo comparamos con el Laptop, pero no es algo que vaya a marcar mucho la diferencia a la hora de procesar. Evidentemente son pequeños detalles que hacen que te cabrees cuando tarda esos pocos segundos en refrescar la máscara (con el nuevo es prácticamente inmediato), pero lo dicho, no es algo que cambie nuestro flujo de trabajo.
4. Tiempo en copiar y pegar ajustes a múltiples RAW (ajustes simples)
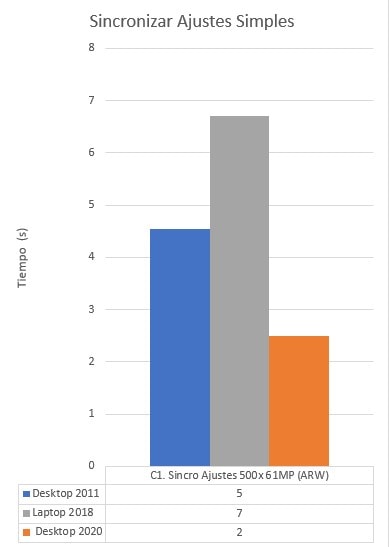
El gráfico muestra tiempo que se tarda en sincronizar los ajustes en los 500 RAW de 61 MP de la Sony a7RIV. El ajuste que tienen realizado es básico, autoajuste de niveles y balance de blancos. Sin capas y sin máscaras.
Esta tarea es otra de las que más realizo en mi día a día. Fundamentalmente en fotografía deportiva donde utilizo menos máscaras de luminosidad y simplemente suelo aplicar un estilo a muchísimas fotos y sincronizar todo. Los valores vuelven a poner al nuevo desktop realizando las tareas en 2” por los 7 que tardamos con el Laptop y 5 con el Desktop 2011. De nuevo, incluso en importaciones muy, muy grandes, no es algo que nos vaya a robar mucho tiempo.
5. Tiempo en copiar y pegar ajustes a múltiples RAW (con máscaras de luminosidad)
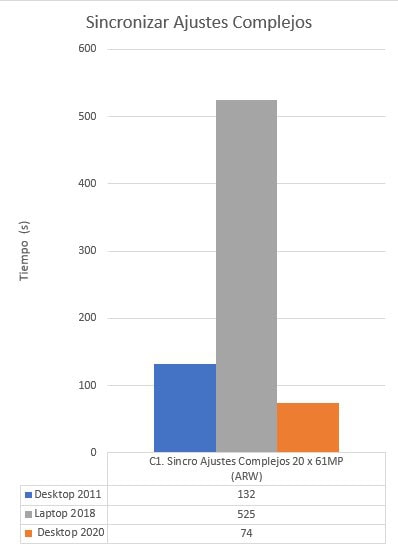
Esta es una de las tareas más exigentes para un ordenador en Capture One. Estamos sincronizando ajustes desde un RAW al resto en el que hemos creado 2 capas extras, y en cada capa una máscara de luminosidad con suavidad al 100%. En cada capa se ha añadido un estilo. Ten en cuenta que las máscaras de luminosidad son dinámicas, con lo que Capture One debe calcularlas para cada archivo RAW.
Es una tarea que realizo frecuentemente en mis fotografías de paisaje, pero cierto es que no sincronizo grandísimas cantidades de fotos , como si que hago en las de deporte. Normalmente son sets de entre 5 y 20 imágenes.
Al ser una tarea más compleja y larga, sí que las diferencias absolutas en tiempo marcan la diferencia entre cada uno de los equipos, ahorrandonos hasta 7 minutos entre el Laptop y el nuevo ordenador que necesita aproximadamente 1 minuto para realizar la sincronización de 20 RAWs
6. Tiempo en Exportar RAW
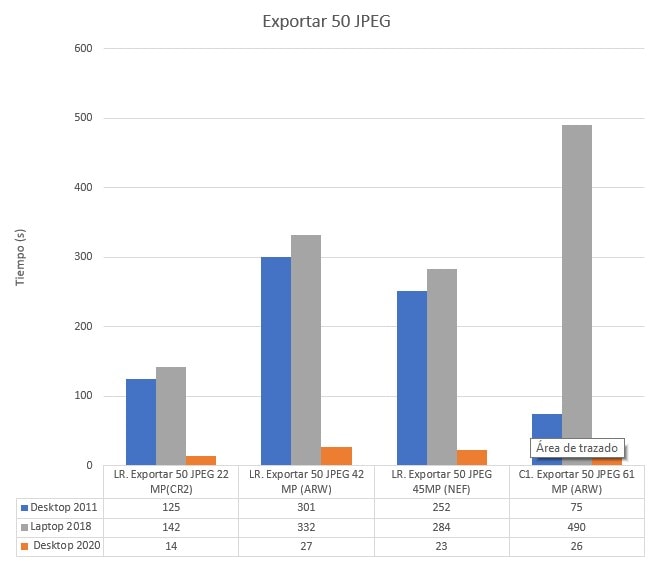
Realizado en Lightroom (24, 42 y 45 MP) y en Capture One (61 Mp). Es muy significativa la diferencia de velocidad entre Lightroom y Capture One a la hora de realizar las exportaciones (muy evidente en los archivos de 61 Mp en el Desktop 2011 que tarda mucho menos que en realizar el mismo trabajo en archivos de 45Mp)
En cuanto a la comparativa entre equipos, pues como era esperable, aquí es otro de los lugares donde voy a ahorrar mucho tiempo. En Lightroom pasamos de los 27 segundos que tarda el desktop nuevo a los más de 300 que tardaríamos en exportar los archivos con el desktop 2011. En Capture One, la diferencia pasa de 75 segundos a 26.
2. Procesado fotográfico: PHOTOSHOP
Para empezar, vamos a analizar los resultados de los equipos en el TEST Benchmark de Puget. Para interpretar los resultados, hay que entender que están comparados con este equipo:
- Intel Core i9 9900K 8 Core
- NVIDIA GeForce RTX 2080 8GB
- 64GB of RAM
- Samsung 960 Pro 1TB
- Windows 10
- Adobe Photoshop CC 2019 (ver. 20.0.0)
que obtiene los siguientes resultados en el test:
- Overall Score: 1000
- General Score: 100
- Filter Score: 100
- Photomerge Score: 100
- GPU Score: 100
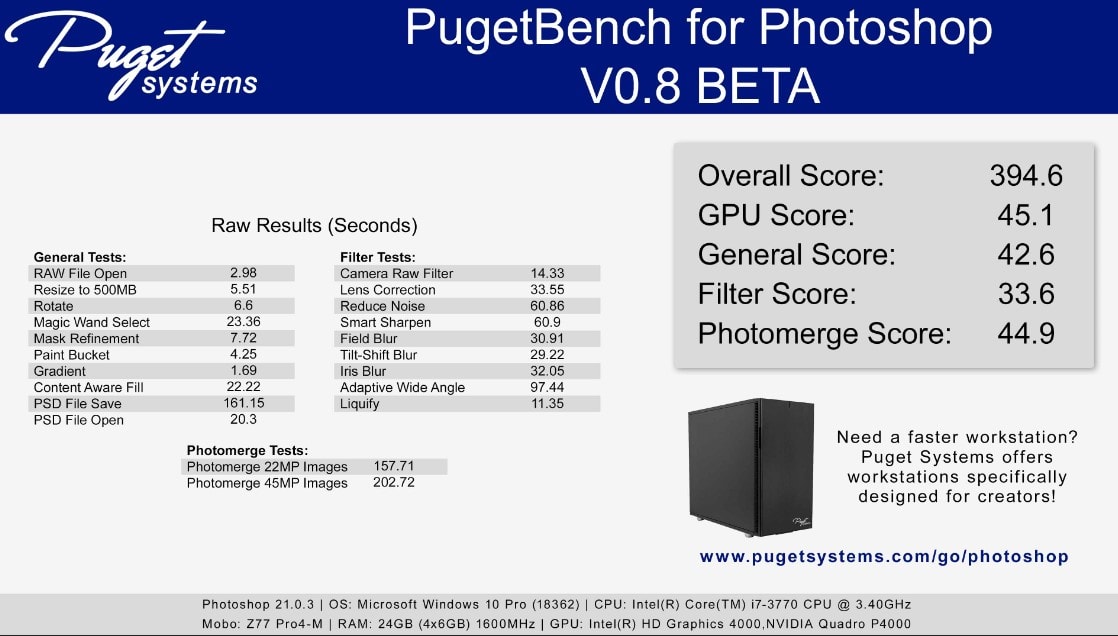
Los resultados obtenidos por el Desktop2011 son estos:
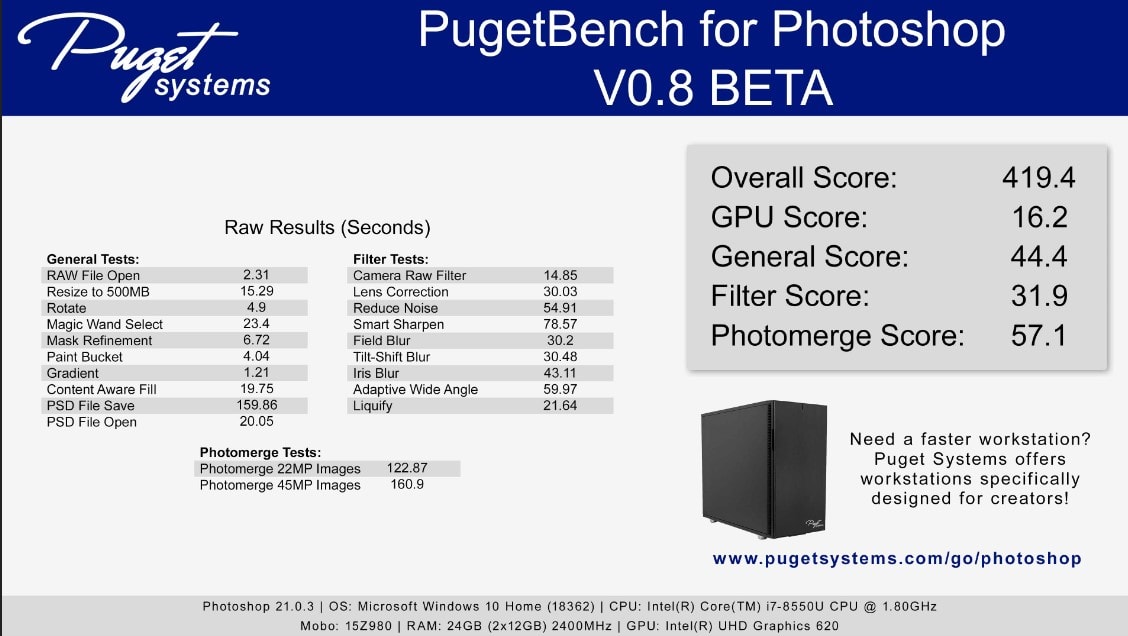
Los resultados obtenidos por el Laptop son estos:
Los resultados del Desktop2020 son estos:
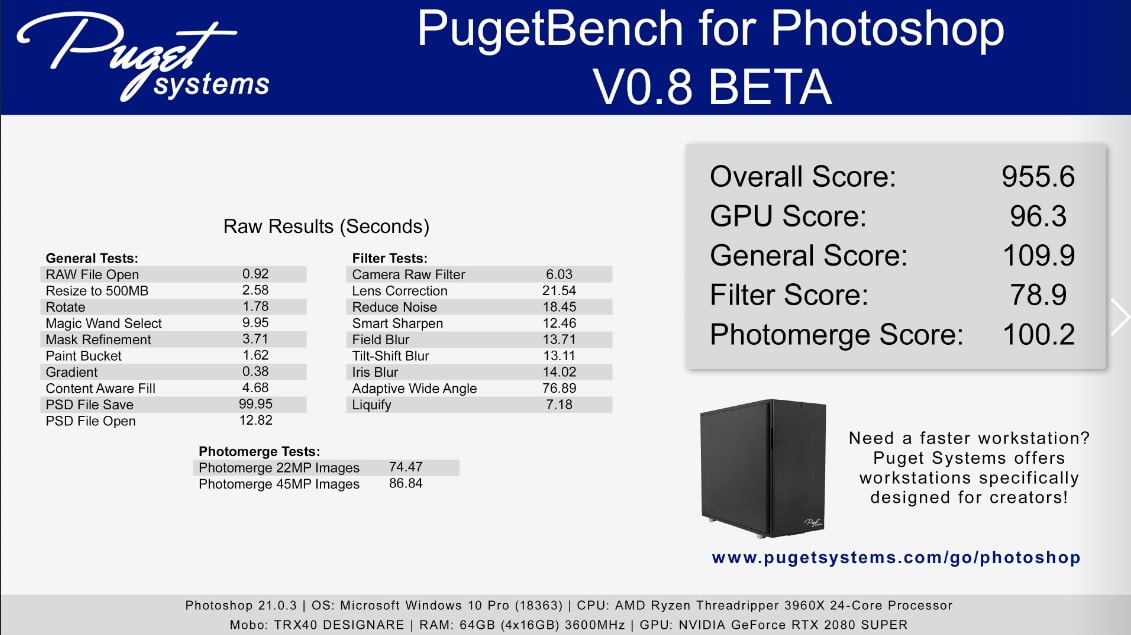
Como podéis ver los resultados del test (que se comparan con los del ordenador de referencia) son muy pobres para el Desktop2011 y el Laptop, y practicamente igual en el caso del Desktop2020 que es un 10% mejor que el de referencia en las tareas generales (columna de la izquierda del gráfico superior) y peor en las tareas relacionadas con la GPU. Personalmente, no utilizo el área de filtros, con lo que ese 10% de mejora es una buena noticia ya que shí se incluyen practicamente todas las tareas que realizao habitualmente.
Aparte de estos resultados del Test de Puget he creído conveniente medir los tiempos que necesito para realizar las tareas que componen el día a día en mi flujo de trabajo.
Aparte del test, estos son los resultados de mis pruebas:
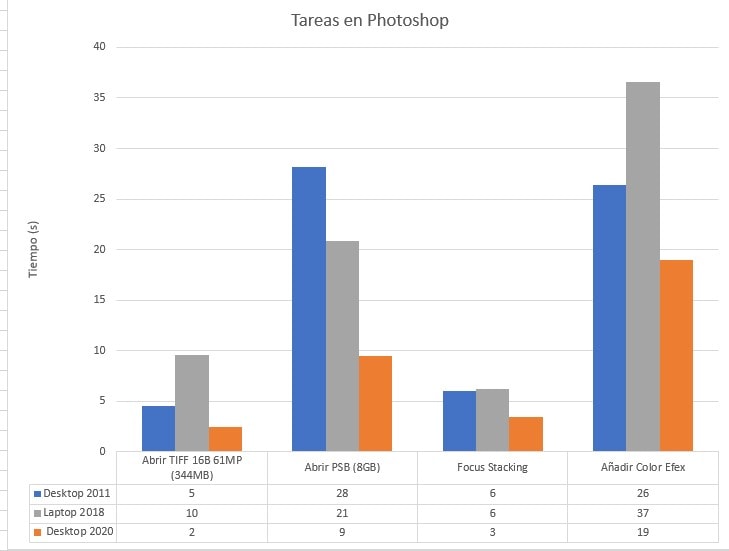
Abrir Tiff 16 bits
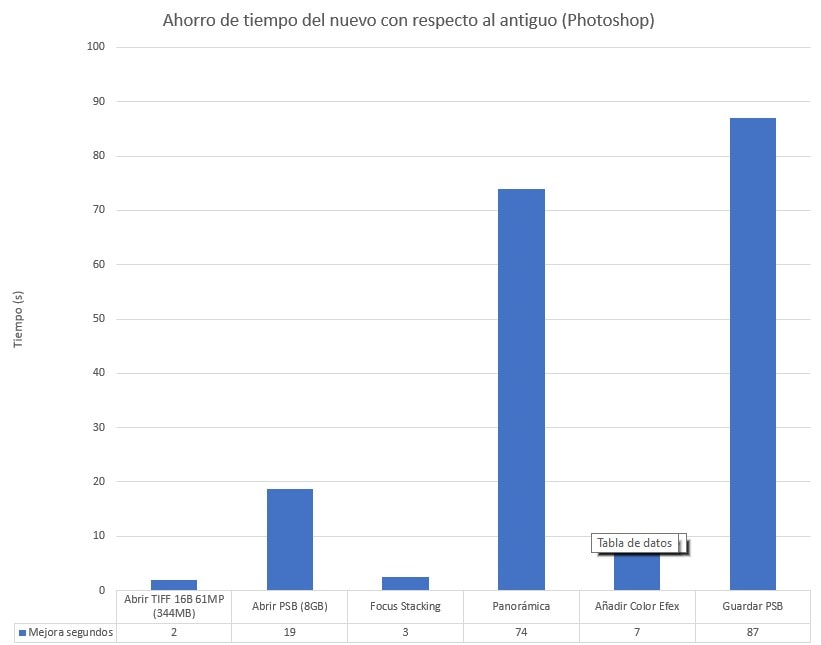
Quizá la tarea que más realizamos en nuestro flujo de trabajo: abrir un archivo tiff procedente del revelado RAW para realizar el procesado complejo. En mi caso, podéis ver cómo, al no ser una tarea muy exigente las diferencias no son abismales pasando de los poco más de 2 segundos que tarda el nuevo ordenador, hasta los 10 segundos que tarda el Laptop pasando por los 5 que necesita el desktop 2011.
2. Abrir archivo PSB de 8GB
Otra de las tareas duras para un ordenador y que, al menos yo, realizo constantemente: abrir uno de esos monstruosos archivos con capas .psb que llegan a pesar 8GB como en el caso del ejemplo. Aquí las diferencias son más notables y se necesitan 9” en el nuevo ordenador y 21” en el Desktop 2011 para abrir el mismo archivo PSB
3. Realizar un Focus Stacking
De manera habitual realizo el blending de varios tiffs procedentes del revelado RAW para crear un Focus Stacking. En este caso he realizado uno partiendo de 3 archivos (en mi caso es lo más habitual, aunque para el ejemplo podría haber usado un ejercicio más exigente con 10 archivos). Los tiempos siguen en consonancia con lo visto hasta ahora: el Desktop 2020 es el doble de rápido que el resto, pero tampoco es una tarea que nos haga perder muchísimo tiempo. Pasamos de 3” a 6” en los más lentos.
4. Realizar una panorámica
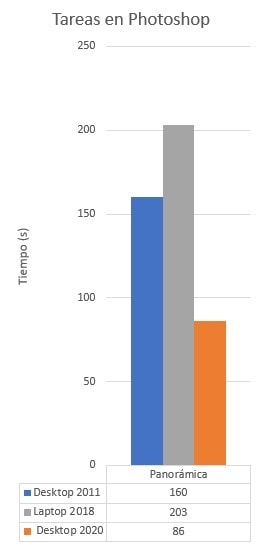
Este caso sí es más exigente para el ordenador. Realizar una panorámica con 6 archivos tiff usando Photomerge de Photoshop nos lleva desde los 29 segundos del Desktop 2020 hasta los 56 segundos del Desktop 2011 pasando por los 52 segundos del Laptop
5. Añadir una capa con filtros Color Efex
Otra de las tareas que realizo prácticamente en todos mis procesados es añadir efectos del paquete de filtros Color Efex, y es algo que acaba desesperándome cuando trabajo con archivos muy grandes. El filtro necesita renderizarse y puede llegar a tardar más de 30” en algunos casos. No puede parecer una eternidad, pero cuando repites la tarea varias veces en el mismo procesado es tiempo el que se va ahí. Con el nuevo Desktop 2020 nos ahorramos más de un 33% del tiempo que necesita el Desktop 2011 y la mitad del tiempo que necesitamos con el Laptop.
6. Guardar el archivo .psb
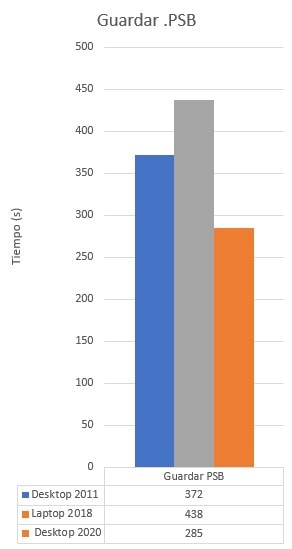
Odio tanto guardar estos macro archivos .PSB que a veces no lo hago durante mucho tiempo por no perder tiempo, hasta que Murphy hace su aparición y Photoshop se cierra jod**endome todo el trabajo. El caso es que es un proceso muy lento, y aunque se puede seguir trabajando con el ordenador mientras, salvo que tengas mucha memoria RAM va a ralentizar bastante tu trabajo. Es un trabajo tan exigente para el ordenador, que incluso en el nuevo super ordenador Desktop 2020 necesitamos 285” para guardar completamente el archivo. Aun así nos ahorramos casi 2 minutos con respecto al Desktop 2011 y aún otro minuto más con el Laptop.
3. Edición de Vídeo: DAVINCI RESOLVE
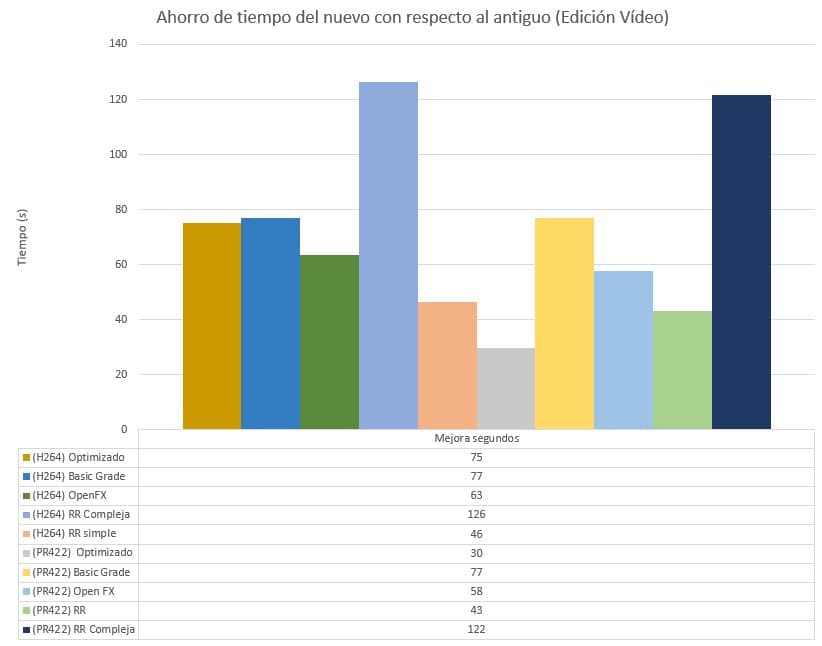
Aquí los resultados son también muy explícitos. Como os comentaba en la intro lo que he hecho es quedarme con los tiempos de renderizado y los puntos del test solo para los codecs h264 y ProRes 422 que son los que utilizo, y cada uno de ellos con 5 niveles de efectos, y gradación de color. Desde el archivo puro y duro, hasta una gradación extrema y reducción de ruido (muy exigente con la GPU).

De este primer gráfico ya podemos ver cómo trabajar con el portatil para este tipo de trabajos es un absurdo. Mi laptop tiene una GPU integrada en el CPU que es muy básica y los resultados saltan a la vista. Por ejemplo, renderizar un clip de 25”con una corrección básica de color le lleva 594” (10 pu*os minutos) mientras que al nuevo ordenador le lleva 17”
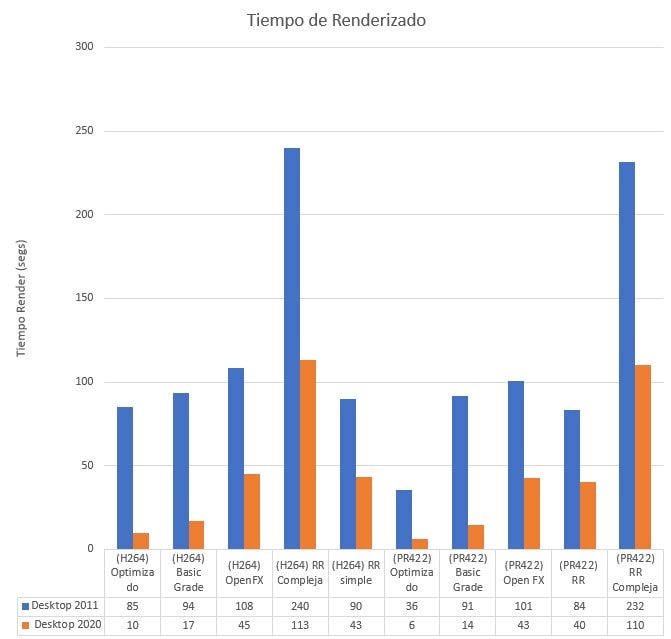
Si sacamos de la competición al portátil, para poder ver con más detalle las diferencias entre ambos Desktop, podemos observar también las diferencias. Por ejemplo, ese mismo clip, en el desktop tardamos 94” en renderizarlo (por 17 del Desktop 2020)…lo que supone un ahorro del 82% de tiempo. Teniendo en cuenta que hablamos de renderizar un clip de 25”, si lo extrapolamos a un vídeo normal de Youtube de 10 minutos, estamos hablando que el nuevo ordenador tardaría unos 6 minutos y medio, y el antiguo más de 37 minutos!!!!
Si analizamos el codec ProRes 422 vemos que el comportamiento es casi calcado. Renderizar un clip de tan sólo 12” nos lleva 14” en el nuevo Desktop 2020 y más de 1 minuto y medio (91”) en el desktop 2011. Y estamos hablando de tan solo 12” de clip!!!!
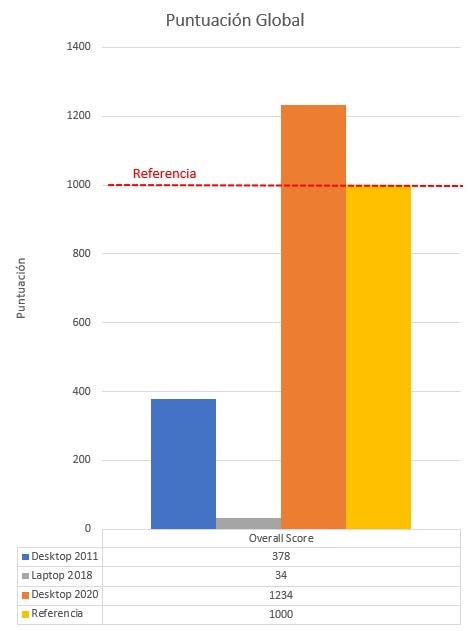
Y si queremos poner en contexto el nuevo Desktop 2020 con un ordenador decente, podemos hacer uso de los “scores” del benchmark que comparan los resultados de tu ordenador con un equipo montado con un CPU Intel Core i9 9900K y una GPU NVIDIA Titan RTX de 24GB . Para entender el gráfico, pensar que la referencia es de 100 puntos, todo lo que sea mayor es mejor (en %) y viceversa.
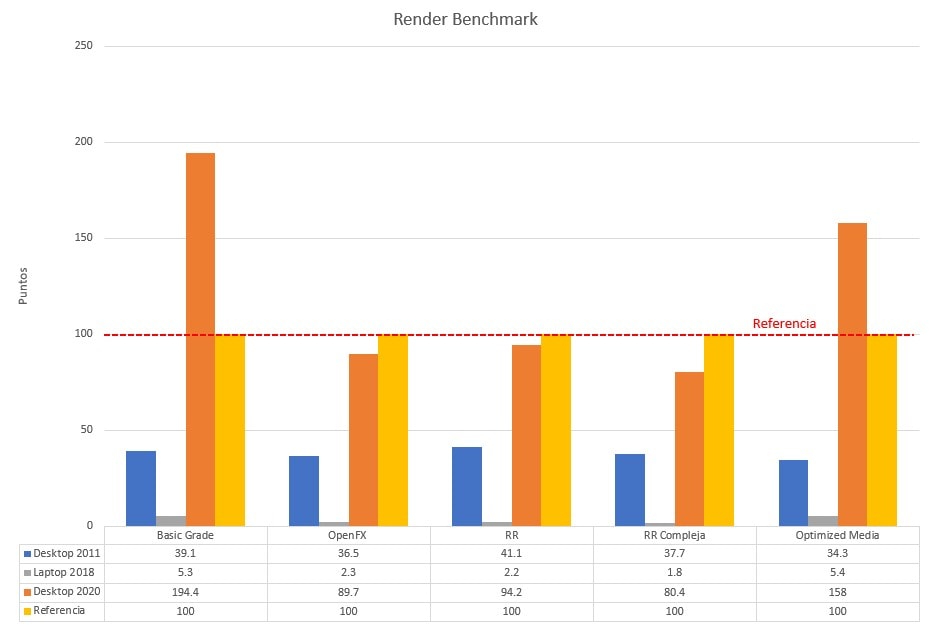
Como era de esperar, el nuevo Desktop 2020 (barrita naranja) es muy superior incluso a ese equipo en las tareas donde menos influye la GPU (OPen FX y Reducción de Ruido) donde los 24 GB de esa pedazo GPU Titan empiezan a hacer su trabajo. Aún así la puntuación global es de un 23% superior a ese equipo de referencia
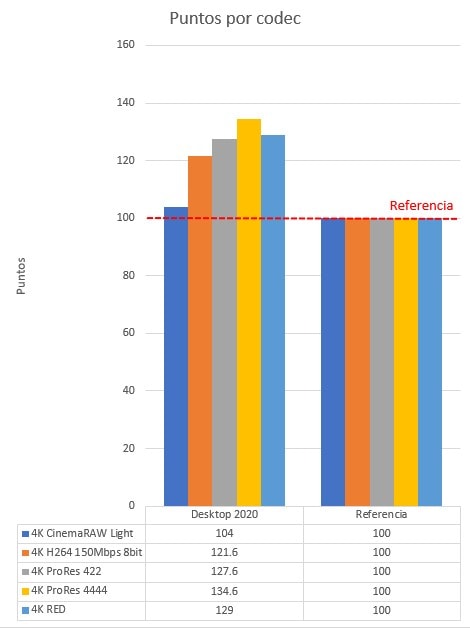
Y si hay algún curioso que quiera ver las puntuaciones en otro tipo de codecs más potentes como el de una RED aquí os dejo las puntuaciones en el que se puede ver como el ThreadRipper 3960 de mi ordenador hace que el equipo sea entre un 22 y 29% más rápido que el equipo de referencia (excepto en los archivos de la Canon C200 (CinemaRAW Light) donde sólo es un 4% más rápido.
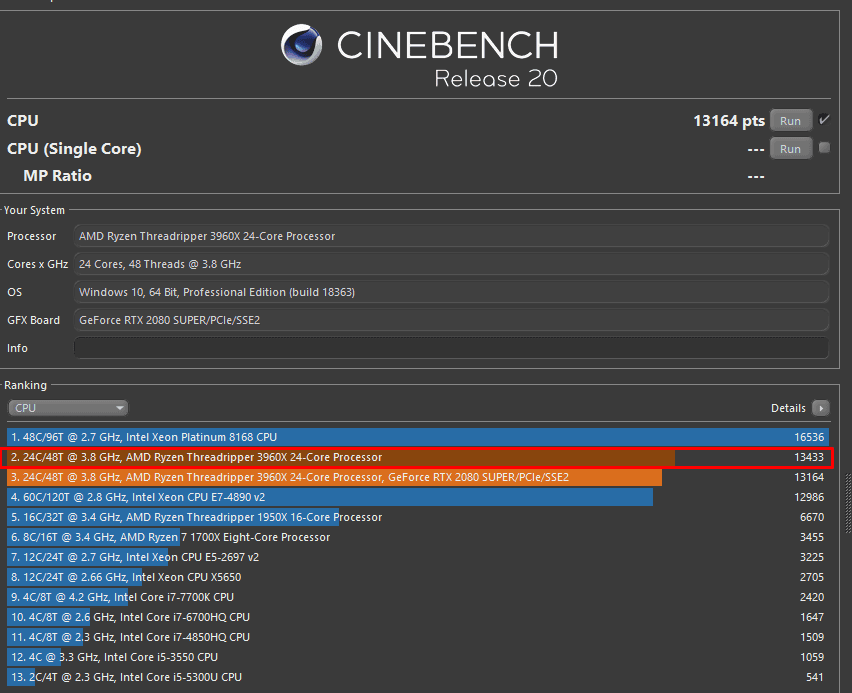
CINEBENCH R20
Y aquí, solo para el nuevo equipo, por si alguien quiere comparar sus resultados con él, os dejo la puntuación que ha obtenido en el Cinebench R20. Una locura!!
Conclusiones
Pues bueno, a pesar de ser una obviedad me ha parecido un ejercicio muy gratificante, y además siempre se aprenden cosas, el poder evaluar de esta manera el equipo. Como podéis ver las mejoras con respecto a mi antiguo ordenador es abismal, pero vamos a verlas en los 3 grandes bloques:
1. Mejoras en el revelado RAW
En cuanto al revelado RAW, sin duda, y como ya esperaba, las mayores diferencias las encontramos a la hora de crear las vistas previas y de exportar los archivos RAW, donde el nuevo ordenador tarda entre el 5 y el 10% del tiempo que necesita el antiguo (Por ejemplo 490 segundos por los 26 del nuevo). En Capture One las diferencias, pese a seguir siendo enormes se reducen, y el nuevo Desktop necesita un 30% del tiempo de lo que necesita el antiguo.
En el resto de tareas, como sincronizar ajustes o importar los RAW, las diferencias porcentuales siguen siendo altas, pero al ser tareas que no llevan mucho tiempo, el ahorro absoluto de tiempo no es algo tan crítico como con las dos tareas anteriormente citadas.
2. Mejoras en Photoshop
En el gráfico podéis ver como los mayores «ahorros» se producen a la hora de hacer las panorámicas (me viene muy bien porque es algo que no puedo hacwer con Capture One) con más de 70″ de diferencia, y a la hora de guardar el archivo .PSB donde me puedo ahorrar cerca de un minuto y medio.
Si comparamos el Desktop2020 con el PC de Referencia de Puget, vemos como hay dos aspectos: es mejor (un 10%) en las tareas generales, ye inferior en las tareas relacionadas con la GPU. Me sorprende este resultado porque la GPU que tengo es algo superior a la del ordenador de referencia. Puede que no tenga todo optimizado en las opciones de rendimiento de Photoshop (el ordenador lo tengo virgen), pero en cualquier cosa, estas tareas son las relacionadas con los filtros que preacticamente yo no utilizo.
En Photoshop ocurre una cosa muy curiosa y que afortunadamente se corresponde con lo que os comenté en la guía de compra del PC para foto y vídeo. Allí os comenté que ni los CPU ni las GPU son especialmente exigidas por Photoshop, y que no se notaban prácticamente diferencias en los trabajos que íbamos a realizar (en Procesado fotográfico por supuesto). Si os fijáis en los resultados del Test Benchmark de Photoshop, veréis como, evidentemente el Laptop y el Desktop 2011 quedan muy abajo (pero por que son equipos antiguos o malos para esta labor) pero el nuevo Desktop 2020, no destaca sobremanera con respecto a un equipo con un CPU muy inferior. Esto es debido a lo que os comenté, si sólo vais a usar Photoshop para tareas de procesado fotográfico, no hace falta (es absurdo) hacerse con un CPU super avanzado o caro, y lo mismo ocurre con la GPU.
3. Mejoras en edición de vídeo
Aquí, como era obvio, las diferencias entre el desktop 2011 y el nuevo 2020 son abismales, y extrapolando los resultados obtenidos a lo que sería un clip normal de los que renderizo día a día puedo ver como ahorraría entre 35 y 70´por trabajo. Una auténtica barbaridad.
Si lo comparamos con el ordenador de referencia de Puget es fácil comprobar cómo pese a la monstruosa tarjeta Titan de 24Gb de VRAM que éste lleva, el nuevo Desktop 2020 es hasta un 94% más rápido (en archivos 4K con gradación de color básica). Mejora en todos los codecs analizados al ordenador de referencia entre un 21 y un 31% (excepto al CinemaRAW al que solo le mejora un 4%), y la puntuación global es un 23% mejor. Simplemente su rendimiento es menor donde entran a predominar las tareas controladas por la GPU (esa Titan es invencible) como en la reducción de ruido compleja, con gradación avanzada de color y 3 nodos de reducción de ruido (tareas que no realizo nunca en mi día a día)
Obviamente, como no había ninguna duda, el PC Nuevo no es que pulverice los tiempos del antiguo, es que, juega en dos ligas diferentes (como ya sabíamos) pero por lo menos aquí podemos ver plasmados las diferencias en “números” que nos pueden dar una idea de a qué nos enfrentamos cuando renovamos un equipo. Obviamente me encantaría poder haber probado el nuevo ordenador con otro equipo más moderno y de menor presupuesto como el que os recomiendo en la guía de compra montado con un Ryzen 9 3900, pero como no lo tengo ajo y agua.
Os animo a todos los que queráis a probar vuestros equipos con estos benchmarks, que son públicos y gratuitos y podéis descargar desde los enlaces que os he puesto para comparar el rendimiento de vuestros equipos con los que tengo aquí.
Deja una respuesta